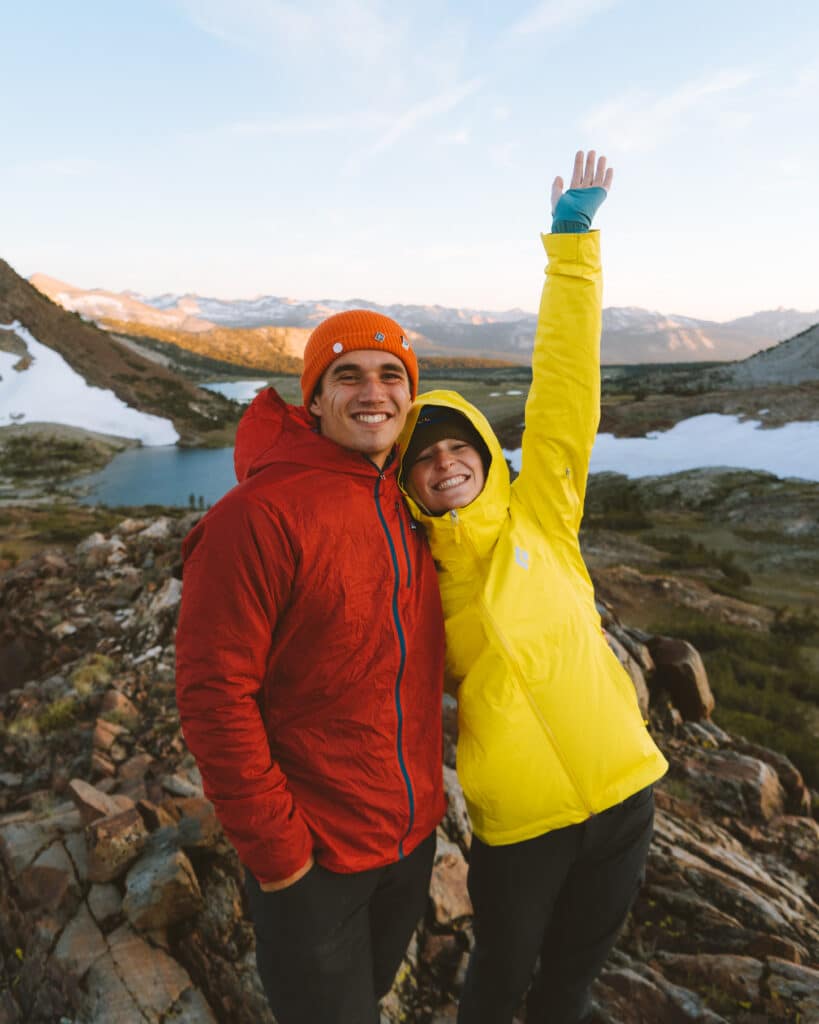
Couple’s Havasupai Backpacking Guide
Disclaimer: This post may contain affiliate links. Please see our Disclosure Policy and Advertiser Disclosure for details.

About the Area: Havasupai is a remote oasis of gorgeous waterfalls and blue-green water belonging to the Havasupai Tribe. Thus, make sure to read the Tribe’s code of conduct before heading into this area to respect their rules. This applies ESPECIALLY when it comes to packing out your trash. This is a trip for adventurers with beginning/moderate backpacking experience. You must be comfortable carrying 30-45lbs during the 10-mile hike in and out of the Grand Canyon through the village of Supai. To make sure you are fully prepared, enjoy our Couple’s Havasupai Backpacking Guide
Step #1: Getting a Permit!
Getting to the magical oasis that is Havasupai is harder than it appears. This is probably the biggest obstacle people face when trying to enjoy our Couple’s Havasupai Backpacking Guide. Permits every year are released on February 1 on an online lottery system. Being logged in on two computers didn’t increase our odds of getting permits. They still sold out within the first hour they were released after constant refreshing. Everyone in your party now needs to make an account on their website as well. Our saving grace was the Cancellations & Transfers page! Make sure to check out the page to see if any permits were re-released.
ALL campground reservations are 3 Nights / 4 Days. Usually, wildlife permits are free or cost little to nothing. Since Havasupai has become such a popular backpacking destination, there is a huge fee to visit. It’s $100 per person per weekday night or $125 per person per weekend night (Friday/Saturday/Sunday nights) charge for each individual permit. Is it worth the $ in our opinion? Absolutely. Definitely a bucket list destination.
Step #2: Packing
SO you got your permit! Now what? Time to prep! We’ve curated our favorite lightweight backpacking equipment that is easy to split up as a couple hiking in together. Check it out here! We like to split up items such as tents and food so that our packs are lighter and more evenly weighted.
Many people have asked about recommended shoes to wear specifically so here are our recommendations based on personal experience! For hiking in and out, G used the Merrell Moab shoes and loved them! No blisters either! Stephen used his Black Diamond Approach shoes while backpacking.
We highly recommend investing in water shoes! They were super convenient for all of the water crossings on the way to Mooney & Beaver Falls! They’re not absolutely necessary but saves some hassle in the long run. G used Keens Whisper Sandals and they were great to have as camp shoes as well!
Step #3: Havasupai Backpacking
Day #1: The Hike in & Setting Up Camp
Havasupai is an excellent trail for backpackers with little to no experience. However, having some outdoor experience is definitely advised. Traveling 10 miles with a heavy pack on is not an easy feat for everyone. Make sure to pack snacks and at least 2L of water per person and store your snacks at the top of your backpack. That way they are easily accessible on your breaks instead of having to dig around through your pack to find them. You will start with an easier section of downhill switchbacks for about the first 1-2 miles. Afterward, the trail is fairly flat the rest of the way! That being said, you are about to see A LOT OF ROCK before you hit any waterfalls.
Once you hike about 8 miles in, you will hit the Supai Village. This is where you will officially check-in to receive your permits and tent tags for the campground. Make sure to bring your confirmation number and ID with you. The process is very quick as long as there isn’t too much of a line! This is where, if you opt to and pay the fees for it, the Helicopter flies in.
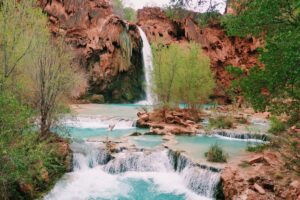
From the village, it’s another 2 miles along beautiful blue streams until you hit 50 Foot Falls and Little Navajo Falls! Two of the most underrated waterfalls in the area since they are usually less populated and less photographed. We decided to have a picnic by 50 Foot Falls one day and we had the area all to ourselves. It truly seemed as if the area resembled something out of a fairytale. The second you head downhill toward the campground, you get a glimpse of Havasu Falls, and it’s beauty instantly makes the 10 miles worth it.
Once you get to the ranger station, you can set up camp anywhere on the map between miles 9 & 10. We found a lovely spot to set up our tent toward the 3rd outhouse. We picked it so we still had some privacy despite the longer walk and river crossing to get to our camp. It was a mere 2-minute walk to see Mooney Falls and was an absolutely incredible spot. If you’re lucky, you’ll get in just as people leave and can snag a spot even closer to the behemoth of a waterfall. We found a site with a picnic table in front of us, and highly recommend if you can find one to grab it!
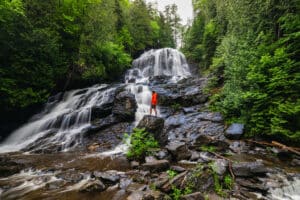
Day #2: Beaver Falls
If we could recommend only one thing off of our couple’s Havasupai backpacking guide, this would be it. This cascading waterfall was definitely our personal favorite to visit! It took a few river crossings and miles to reach, but it was the most stunning hike along crystal blue rivers and creeks and bright greenery the entirety of the way there.
We left around 8 am and arrived in time to only have 2 other people occupying the falls. We set up a picnic for lunch and ate next to the water before jumping in! You can walk along the ledge of the top part of the falls and cliff jump of the far left side (when facing the bottom of the falls) as it’s deep enough for the adrenaline junkies out there. But, beware, the sun can disappear behind the canyon quickly so your time span to jump in and dry off and stay warm is a little bit limited.
Day #3: Havasu Falls
Havasu Falls: the first large waterfall you stumble across in this magical Indian reservation. It is indeed a mouth dropping, awe-inspiring view after you hike in and see it for the first time. We visited Havasu falls quite a few times throughout our trip, but this day we set up the hammock in the little island in front of the falls, jumped in the water, and laughed about life. There were some larger groups bring frisbees and footballs, and if you were so inclined to carry one in, it seemed like they were having a blast! We found a little cave on the right hand side of the waterfall too which made for a perfect snack and journaling spot. Even in March, the water felt great despite it being a little bit chilly!
Day #3 Continued: Mooney Falls
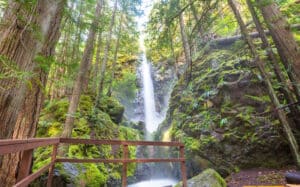
The trek to Mooney Falls was SO much fun! It was super slippery and steep, you are holding chains, going through caves, and climbing ladders the entirety of the way down from the campground to the massive waterfall and it was epic! Our best piece of advice would be to hike down early. That way, you can avoid waiting for the crowds to go up and down the ladders as there is a bunch of foot traffic in the middle of the afternoon.
If you are afraid of heights, make sure to take it down nice and easy as it can potentially be a dangerous descent. If you own a hammock, we set one up down by the waterfall and had the most relaxing time literally hanging out in front of such a gorgeous view. In order to get to Beaver Falls, you will have to descend down past Mooney Falls as well! The more times the merrier!
Day #4: The Hike Out
The best Recommendation we received: start EARLY. We left around 6:30 am so that we wouldn’t be hiking out in direct, harsh sunlight the entirety of our way out. After about 8 miles of flat ground, be prepared for a gnarly 2 more miles up switchbacks to get back to the parking lot. It took Stephen and me about 4-5 hours to get back to the lot. It will all feel worth it when you get to the top and see the amazing view of the Grand Canyon once more.
Time to get those permits for this bucket list destination! If you have any questions about a trip to Havasupai, feel free to ask in the comments below! Or, let us know if there’s anything else you’d add to our Couple’s Havasupai Backpacking Guide. Happy wandering!


[…] first trip Stephen and I ever did together was a 4-day backpacking trip to Havasupai, Arizona only a month after we first started dating. And if that trip didn’t bond us together, I […]